Percussion-Making Activities for Kids
When musicians need to keep a rhythm going, nothing works better than a good percussion instrument. A percussion instrument is any musical instrument that is played by striking, shaking, rubbing, or scraping. Types of percussion instruments include drums, cymbals, rattles, and chimes.
Kids, interested in making your own percussion instrument? Try one of these percussion-making activities that use everyday objects!
Make a Spinning Drum
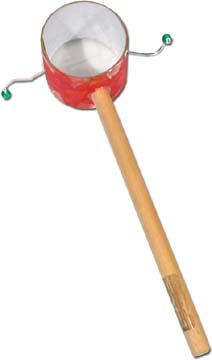
Called den-den daiko in Japanese, these traditional children’s toys were made popular by The Karate Kid Part II film.
You’ll need:
- Cardboard ring (like what’s at the center of a roll of packing tape)
- 6" long stick (a chopstick or dowel)
- 2 beads
- String
- Markets, paint, stickers
- Clear packing tape
- Glue
- Find a cardboard ring from the center of a roll of packing tape or have an adult make you one by cutting a cardboard tube into rings.
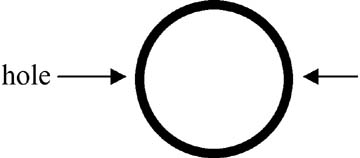
- Have an adult make 2 small holes across from each other in the center of the ring’s walls using a nail or awl. See arrows for where to make the holes.
- Decorate the outside and inside of the cardboard ring using markers, paint, or stickers.
- Thread a piece of string through the 2 holes. Make sure that the string is long enough on either side of the ring that you can wrap the string around to the front of the ring and the ends will meet.
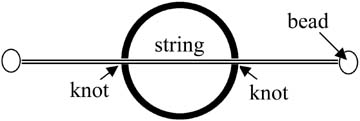
- Tie knots in the string on either side of the cardboard ring.
- Tie a bead to each end of the string.
- Cover the open face and open back of the cardboard ring with clear packing tape. Be sure to stretch the tape tight for the best sound.
- Glue the stick to the bottom of the cardboard ring. Let dry.
- Now twirl your drum by holding the stick between your palms and rubbing your hands back and forth. The beads at the end of the string will spin and hit the packing tape at the front and back of your drum to make a sound!
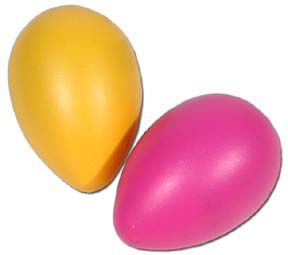
Make an Egg Shaker
Shake an egg! Make some noise!!
You’ll need:
- Plastic split Easter egg
- Dry rice or small beans (like lentils)
- Glue
- Fill Easter egg with a small amount of dry rice or beans. Close and shake to test sound. Remove or add rice/beans to improve sound. Remember, don’t overfill egg or the sound will be dull.
- Once you like the sound, apply a small amount of glue along rims of egg halves. Quickly close egg and hold together until glue dries.
Make a Rainstick
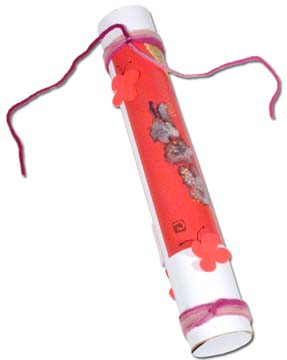
Although the rainstick were created in South America, groups from many different cultural backgrounds, including taiko groups, use rainsticks as a percussion instrument. We present a recycle-friendly version here.
You’ll need:
- Cardboard tube about 18” long
- Flat head nails
- Hammer
- Dried beans, dry rice, unpopped popcorn, dry tiny pasta
- Brown paper from a grocery bag
- Scissors
- Glue
- Markers, crayons, construction paper, stickers, paint, magazine cutouts, yarn, etc.
- Carefully hammer nails into cardboard tube. If needed, use phone books or blocks on either side of tube to stop it from rolling. You can place the nails randomly or in a pattern, but when you look into your tube you should see a maze of nails.
- On the brown paper, trace the end of your tube. Then draw a bigger circle around it. Cut out larger circle.
- Draw lines between the circles. Then cut along lines to make spokes.

- Put glue on spokes and glue the cap to one end of tube. Let dry.
- With one end of the tube sealed, put a mixture of dry rice, beans, seeds, or corn kernels into the tube. Cover the open end with your hand and tip over to hear how the stick sounds. Add or remove mixture to improve sound. Remember, you don’t want your rainstick to be too heavy, so don’t put in too much filling.
- When you’re happy with the sound, repeat steps 2-4 to seal the other end of the tube.
- Decorate the outside of the tube using markers, crayons, paint, construction paper, magazine cutouts, yarn, or stickers.
- Now play your rainstick by tipping it back and forth. Sounds are made by the beans, rice, and seeds hitting the nails inside of the tube.
Family Activity Guide
An exhibition family activity guide for Big Drum: Taiko in the United States is available to download in a PDF format. It presents the exhibition content to younger audiences in fun and informative ways. Although created for on-site visitors, the activities are appropriate for use even without the on-site experience.
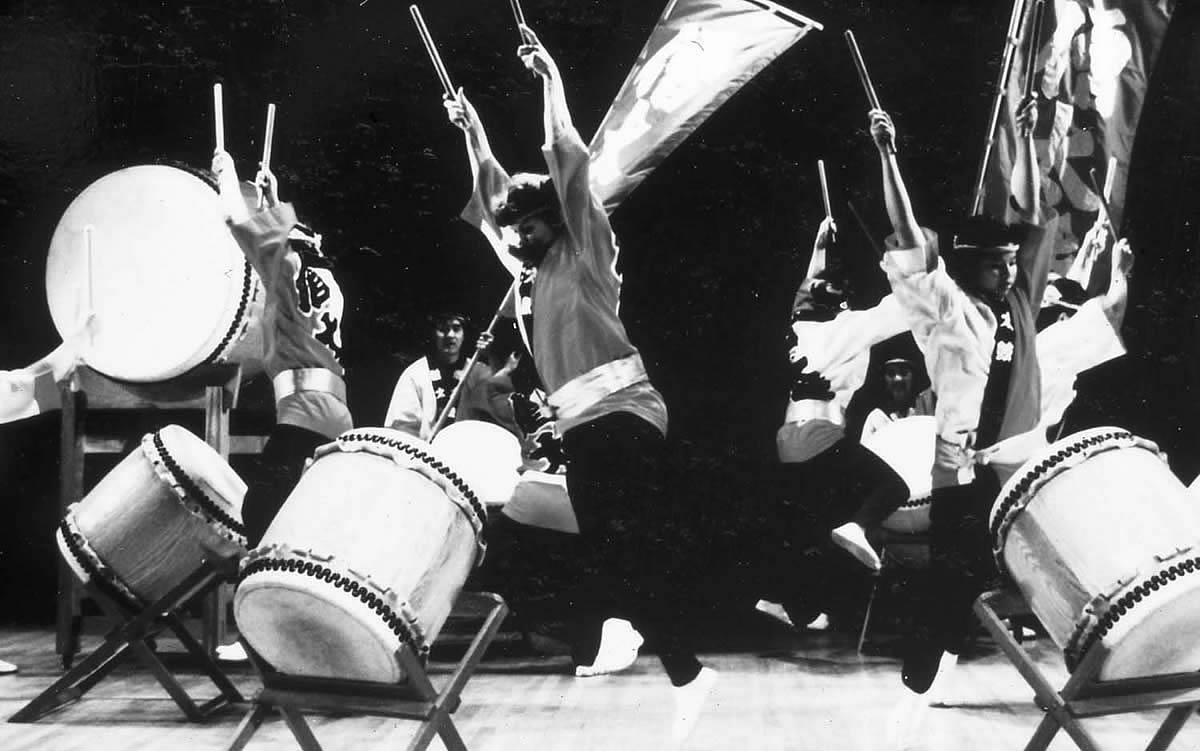
Big Rhythms, Big Drums: Big Drum School Program
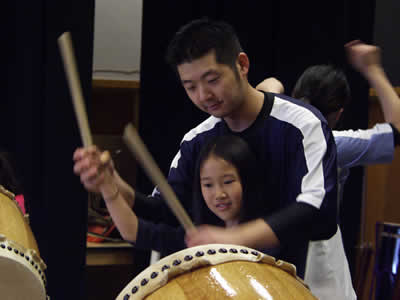

Taiko, literally “big drum” in Japanese, is a musical phenomenon that combines powerful drumming with dynamic movement. In conjunction with the Big Drum: Taiko in the United States exhibition, the school program provides students with an introduction to taiko in this one-hour interactive performance. Students not only learn about the history of taiko in America, the different instruments used in taiko, and basic drumming techniques, they also take part in the performance when they are handed the bachi sticks to strike the drums for themselves. The performers literally take students on the same journey that the “Big Drum” has taken here in the United States.
Presented by ![]()
Recommended Age: K-12th grade
Program Length: 1 hour
Available: Tuesday, Wednesday, and Thursday
August 2 through December 15, 2005
60-student limit per session
Reservations
To make a reservation, call 213.830.5601 or e-mail groupvisits@janm.org. Free admission and free transportation may be available for your school group. Please inquire when calling for a reservation.
Percussion-Making Activities for Kids
When musicians need to keep a rhythm going, nothing works better than a good percussion instrument. A percussion instrument is any musical instrument that is played by striking, shaking, rubbing, or scraping. Types of percussion instruments include drums, cymbals, rattles, and chimes.
Kids, interested in making your own percussion instrument? Try one of these percussion-making activities that use everyday objects!
Make a Spinning Drum
Called den-den daiko in Japanese, these traditional children’s toys were made popular by The Karate Kid Part II film.
You’ll need:
- Cardboard ring (like what’s at the center of a roll of packing tape)
- 6" long stick (a chopstick or dowel)
- 2 beads
- String
- Markets, paint, stickers
- Clear packing tape
- Glue
- Find a cardboard ring from the center of a roll of packing tape or have an adult make you one by cutting a cardboard tube into rings.
- Have an adult make 2 small holes across from each other in the center of the ring’s walls using a nail or awl. See arrows for where to make the holes.
- Decorate the outside and inside of the cardboard ring using markers, paint, or stickers.
- Thread a piece of string through the 2 holes. Make sure that the string is long enough on either side of the ring that you can wrap the string around to the front of the ring and the ends will meet.
- Tie knots in the string on either side of the cardboard ring.
- Tie a bead to each end of the string.
- Cover the open face and open back of the cardboard ring with clear packing tape. Be sure to stretch the tape tight for the best sound.
- Glue the stick to the bottom of the cardboard ring. Let dry.
- Now twirl your drum by holding the stick between your palms and rubbing your hands back and forth. The beads at the end of the string will spin and hit the packing tape at the front and back of your drum to make a sound!
Make an Egg Shaker
Shake an egg! Make some noise!!
You’ll need:
- Plastic split Easter egg
- Dry rice or small beans (like lentils)
- Glue
- Fill Easter egg with a small amount of dry rice or beans. Close and shake to test sound. Remove or add rice/beans to improve sound. Remember, don’t overfill egg or the sound will be dull.
- Once you like the sound, apply a small amount of glue along rims of egg halves. Quickly close egg and hold together until glue dries.
Make a Rainstick
Although the rainstick were created in South America, groups from many different cultural backgrounds, including taiko groups, use rainsticks as a percussion instrument. We present a recycle-friendly version here.
You’ll need:
- Cardboard tube about 18” long
- Flat head nails
- Hammer
- Dried beans, dry rice, unpopped popcorn, dry tiny pasta
- Brown paper from a grocery bag
- Scissors
- Glue
- Markers, crayons, construction paper, stickers, paint, magazine cutouts, yarn, etc.
- Carefully hammer nails into cardboard tube. If needed, use phone books or blocks on either side of tube to stop it from rolling. You can place the nails randomly or in a pattern, but when you look into your tube you should see a maze of nails.
- On the brown paper, trace the end of your tube. Then draw a bigger circle around it. Cut out larger circle.
- Draw lines between the circles. Then cut along lines to make spokes.
- Put glue on spokes and glue the cap to one end of tube. Let dry.
- With one end of the tube sealed, put a mixture of dry rice, beans, seeds, or corn kernels into the tube. Cover the open end with your hand and tip over to hear how the stick sounds. Add or remove mixture to improve sound. Remember, you don’t want your rainstick to be too heavy, so don’t put in too much filling.
- When you’re happy with the sound, repeat steps 2-4 to seal the other end of the tube.
- Decorate the outside of the tube using markers, crayons, paint, construction paper, magazine cutouts, yarn, or stickers.
- Now play your rainstick by tipping it back and forth. Sounds are made by the beans, rice, and seeds hitting the nails inside of the tube.
Family Activity Guide
An exhibition family activity guide for Big Drum: Taiko in the United States is available to download in a PDF format. It presents the exhibition content to younger audiences in fun and informative ways. Although created for on-site visitors, the activities are appropriate for use even without the on-site experience.
Big Rhythms, Big Drums: Big Drum School Program
Taiko, literally “big drum” in Japanese, is a musical phenomenon that combines powerful drumming with dynamic movement. In conjunction with the Big Drum: Taiko in the United States exhibition, the school program provides students with an introduction to taiko in this one-hour interactive performance. Students not only learn about the history of taiko in America, the different instruments used in taiko, and basic drumming techniques, they also take part in the performance when they are handed the bachi sticks to strike the drums for themselves. The performers literally take students on the same journey that the “Big Drum” has taken here in the United States.
Presented by ![]()
Recommended Age: K-12th grade
Program Length: 1 hour
Available: Tuesday, Wednesday, and Thursday
August 2 through December 15, 2005
60-student limit per session
Reservations
To make a reservation, call 213.830.5601 or e-mail groupvisits@janm.org. Free admission and free transportation may be available for your school group. Please inquire when calling for a reservation.